The road to my level 1 HPR certification began with an impulse buy of a Wildman Darkstar Jr kit during a Black Saturday sale. The kit was fiberglass, looked awesome, and the price was low enough that it seemed like too good of a deal to pass up. Once the kit arrived, it looked even better than the on-line photos, and all of the various bits and pieces fit together nicely. Then the reality that I had no experience building fiberglass kits or what would need to be different when compared to more traditional low power kits sat in, and the kit went back into its box.
After obtaining and reading the book Modern High-Power Rocketry Vol 2, combing the internet for build threads, tips and tricks, and basically satisfying myself that I would at least have a general idea of what would be required to build a high powered rocket, I pulled the kit back out of the box and began to contemplate my build.
The details of the kit from the Wildman website were as follows:
This fiberglass dual deployment rocket features a 38mm motor mount, making it a great L1 or L2 certification kit. Standing nearly five feet tall and measuring 2.1″ in diameter, it weighs just 4.5 pounds and can be flown on motors from H through J impulse.
This Kit Includes:
1 Fiberglass booster airframe
1 Fiberglass payload bay
1 Fiberglass coupler
1 Fiberglass avionics bay switch band
6 Fiberglass fins
2 Centering rings
2 Single-piece stepped avionics bay lids
38mm fiberglass motor mount tube
Filament-wound nosecone
I knew from the beginning that I would not be focusing on performance or any sort of “Wow” factor. I wanted to build the equivalent of a flying tank that would be able to survive as many mistakes as possible and remain in a flying condition. With that in mind, I began assembling the various components I would need for the build.
I decided to follow the steps outlined in a post I located on the rocketryforum.com website, where member Crazy Jim, AKA Jim Hendrickson, went into exquisite detail on how to build not only a fiberglass high power, rocket but this exact kit! The tips, tricks, various methods, and other details found throughout the thread, along with the step by step directions, including pictures, made the whole process seem less complex and by breaking it all down into small steps, it suddenly didn’t seem to be as overwhelming as it had in the beginning. The thread can be found here.
I had purchased an Aeropack 38mm motor retainer, appropriate lengths of kevlar, rail buttons, and some Rocketpoxy epoxy when I originally bought the kit, so it I had to decide on what hardware I would need to hook everything together, electronics, and finally parachutes for recovery.
I decided to attach the booster recovery harness directly to the motor mount using epoxy rather than trying to fit some sort of U-bolt or eye bolt into the tiny space between the 38mm motor mount tube and the 2.2″ body tube. After cleaning, sanding, and dry-fitting all of the parts together for the booster section of the rocket, I carefully labeled and marked the position of all of the centering rings, fins, fillet pull lines, rail button locations, and vent holes. I then followed the steps in the thread and the motor mount and fins quickly went from loose pieces of fiberglass to the complete lower half of a rocket. When it was all assembled, the fact that booster section alone was larger than any of my current low power or medium power rockets brought home the fact that this was going to be quite the rocket when it was completed!
The nose cone and payload section went together without any issues. I decided to make the nose cone bulk head removable and epoxied a piece of all-thread into the tip (it would have been nice to have a threaded aluminum tip, but my generation of the kit didn’t ship with one), and then secured the bulk head to the all thread using multiple bolts and lock washers. I then installed a u-bolt to all for the recovery harness attachment.
This left the e-bay section as the final piece to complete. It would have likely been completed earlier, but there were so many different ways of putting it together, and each had benefits and downsides, that it took quite a while to decide how to proceed. After reviewing multiple methods of constructing the section, and checking the price on the required hardware for each method, I settled on using a single piece of all-thread running down the center of the section with a u-bolt on both ends. Although this method wasn’t as elegant as some, it was cost effective, and all of the required hardware was available locally.
Now that the rocket itself was complete, I began to contemplate the actual launch and obtaining a motor for my certification flight. For those that may not be aware, many HPR motors are required to be shipped as hazmat, and the roughly $30 fee can easily double the cost of a single motor. Because of this, I contacted Steve Shannon with the Big Sky Rocketry Association to determine if their launches ever were attended by a vendor, or how their members purchased their motors. Steve explained their system of group ordering (the hazmat fee is the same if you order 1 or 100 motors) to save on shipping, and advised me that their annual group order was fast approaching. After making arrangements to be contacted when the ordering process began, I went back to planning for my level 1 cert flight.
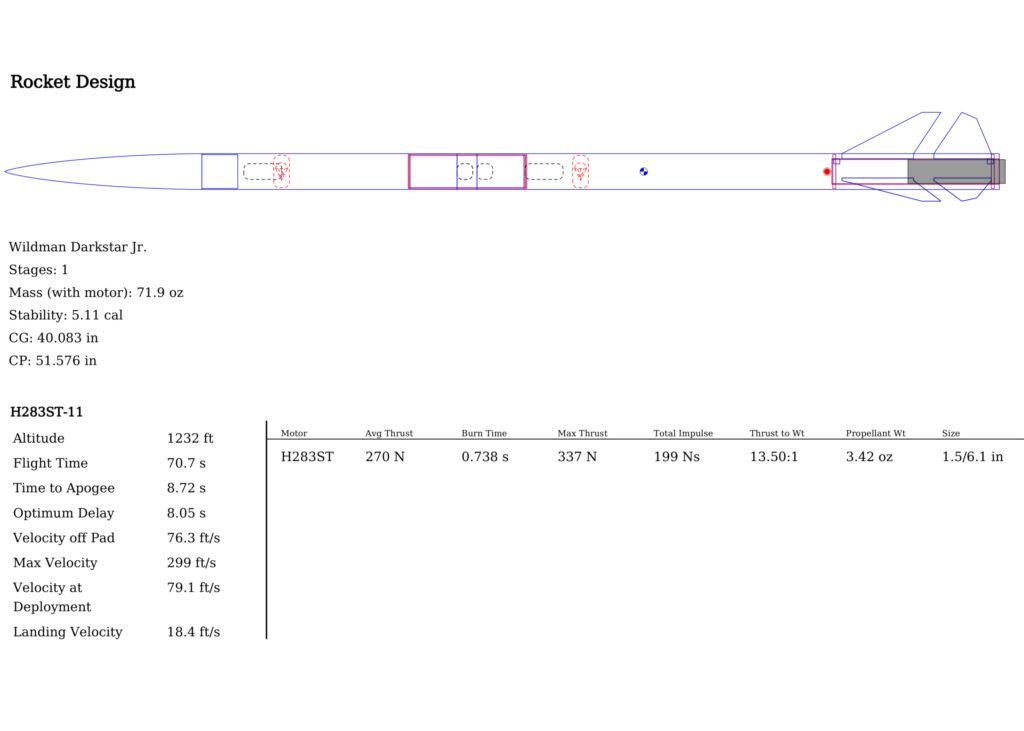
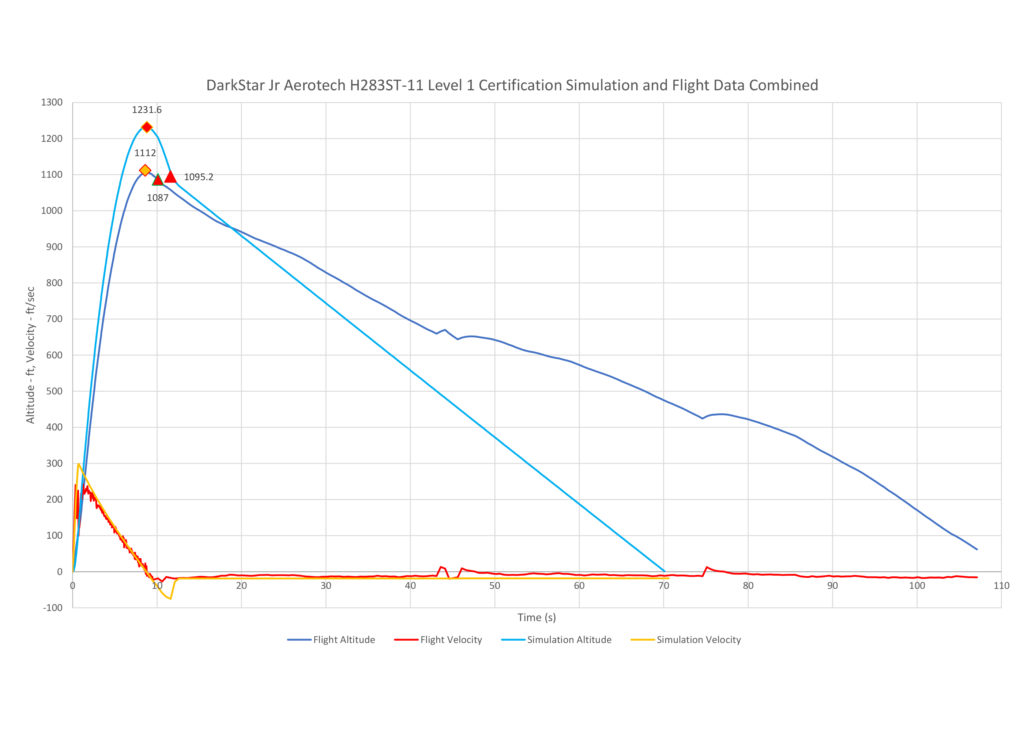
Using the freely available rocket simulator software, OpenRocket, I created the virtual model of my rocket, updating the various section’s weight and center of gravity details, and began to “test” various motor options. Although I originally planned to use Aerotech reloadable motors, the costs of the motor cases and the lower price of the singe use motor began to make that option more appealing. After numerous hours tweaking various settings in the simulator and testing various motors, I decided on the Aerotech H-283-W single use motor. The simulation showed an expected altitude of 1232 feet with an 8.72 second time to apogee. This would keep the entire flight easily within eye sight, and would allow me to use the motor’s ejection charge rather than rely on an electronic device for deployment.
Having the motor selected gave me the final weight needed to determine what parachute to use for recovery. After trying various sizes of basic, flat, parachutes (or more accurately parasheets) in the simulator, I determined that a chute about 50″ would bring the rocket down at a safe 18 feet per second. The parachute was ordered and I began the process of constructing the recovery harnesses for both the booster and payload sections. Although I wouldn’t be using the payload section for recovery during this flight, I planned to attach the recovery harness to avoid any unexpected separations or other issues. I had originally planned to use kevlar for both harnesses, but I did not have enough on hand to provide the lengths I wanted for both harnesses, and after reading about the benefits of nylon (stretches, doesn’t zipper as easily), and discovering a method of using masking tape to provide burn resistance, I decided to construct the booster harness from nylon webbing and use the smaller kevlar webbing in the payload section where space was limited.
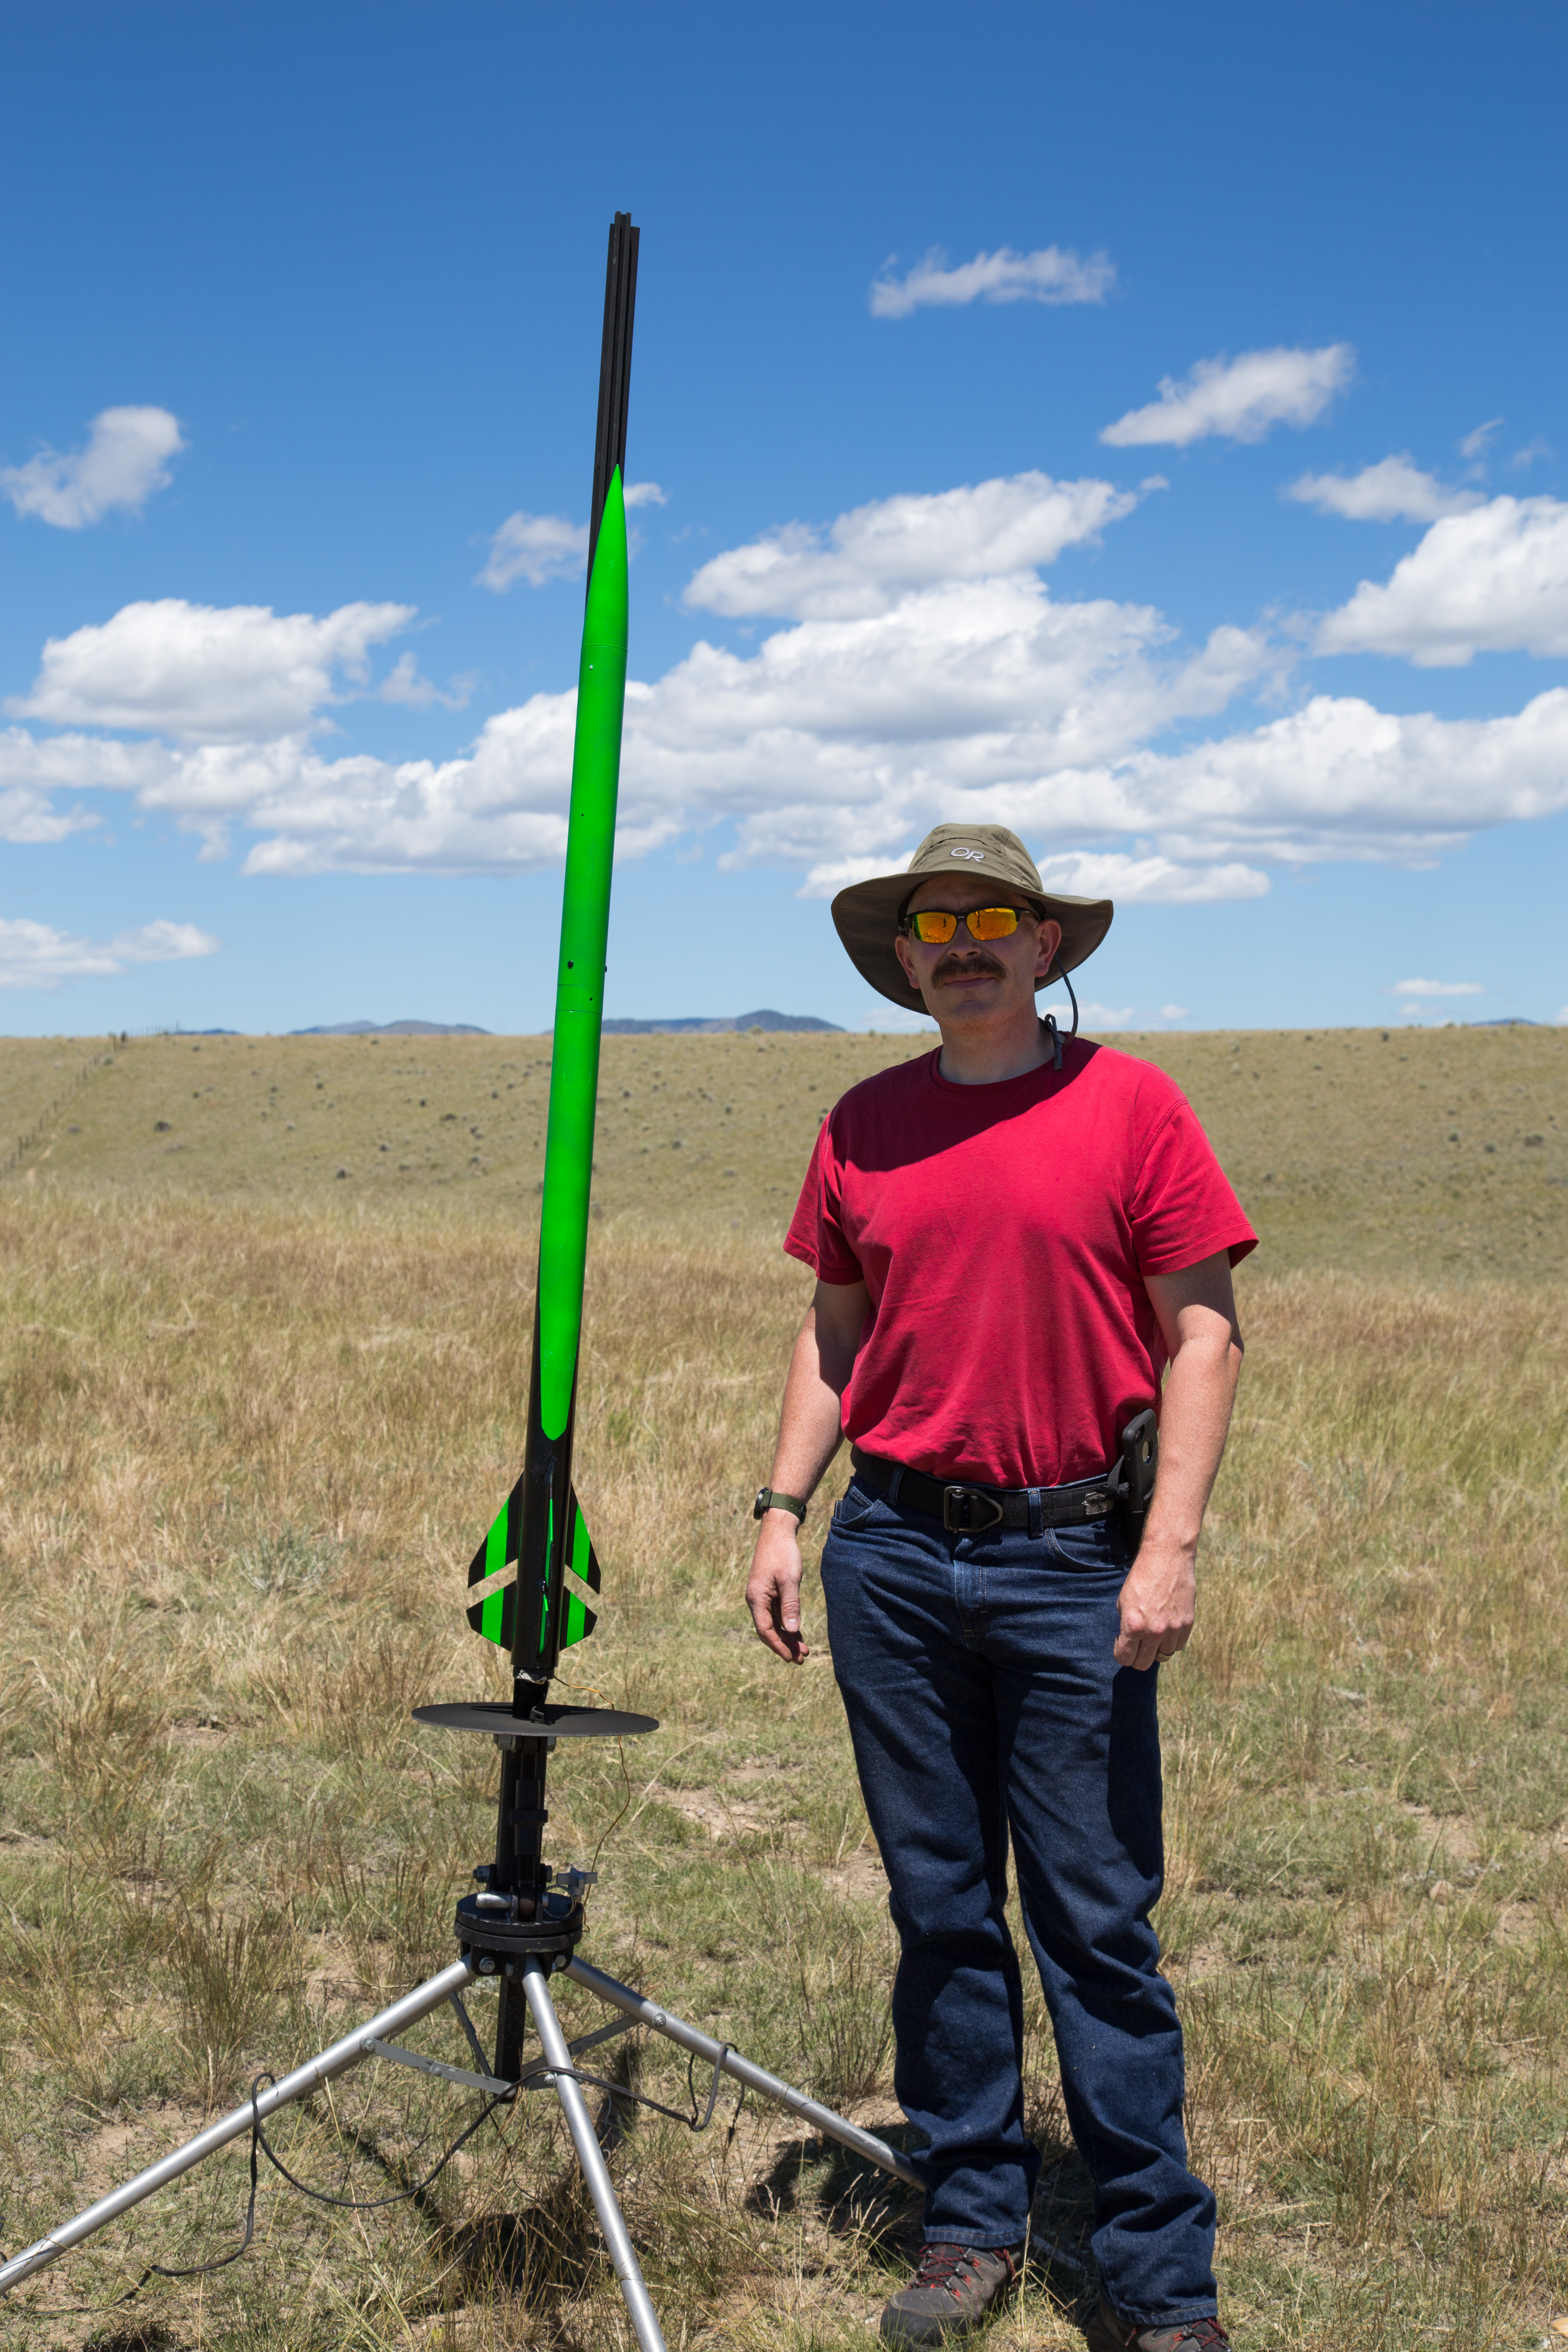
Although I had originally planned to fly the rocket naked (no paint), I had time to spare so I planned out and rattle canned a basic neon-green and black paint job. I also used Future floor polish to give the rocket a clear coat. It didn’t turn out too bad, and from launch distance, it looks awesome!
The final assembly pieces to come together before the launch were an Eggtimer Quantum flight computer and an Eggfinder mini GPS locator. Although the flight would use motor eject for recovery, I wanted to test out the Quantum and become comfortable with its operation for my eventual level 2 certification. I also planned on flying the rocket with the Quantum activated and an ejection charge loaded as an extra piece of insurance incase the motor ejection had some sort of failure. After assembling, testing, and familiarizing myself with both devices functions and basic operation, I mounted the Quantum in the e-bay and built an enclosure for the Eggfinder that attached to the payload recovery harness.
I then obtained some FFFF black powder and began ground testing my ejection charges. I researched methods of determining the amount of black powder required for the size of rocket I was attempting to separate and began the tests. It appeared that 1.2 grams of powder were sufficient to separate the booster from the front of the rocket without the nose cone hitting the end of the recovery harness.
The week before the launch date arrived, but the ordered parachute had not. The vendor stated that the order should arrive in time for the launch, but when it didn’t arrive on the day before the launch, plan B kicked in and a quick trip to the fabric store provided the nylon, while the local farm and ranch store provided a small diameter rope for shroud lines. After reading a few sites that detailed how to construct a parachute, I managed to build one and still get a few hours of sleep before leaving for the launch.
The launch was held at the Big Sky Rocketry Association’s Twin Bridges location, which is about a four hour drive! The launch was held on June 24, 2017, and the day was clear and warm.
After arriving at the launch site, checking in with the launch organizers, paying my motor bill and my membership in the Big Sky Rocketry Association, I began to get things ready for the launch.
I had created a check list to make sure that everything was completed, and in the proper order, and after confirming that the only item that needed to be witnessed was the motor assembly, I found a qualified witness, Andrew Horton, and completed the very simple assembly for the single use Aerotech motor under his observation. Once the motor was installed, I put the rocket together, confirmed everything was working properly and had power, had the rocket inspected by the RSO, and then proceeded to the launch pad.
The rocket went onto the rail without an issue (and I was thanked for using rail buttons rather than launch lugs), and after receiving a quick tutorial in how the club’s launch system functioned, the ignitor was installed, continuity was confirmed, and it was back to the launch control table.
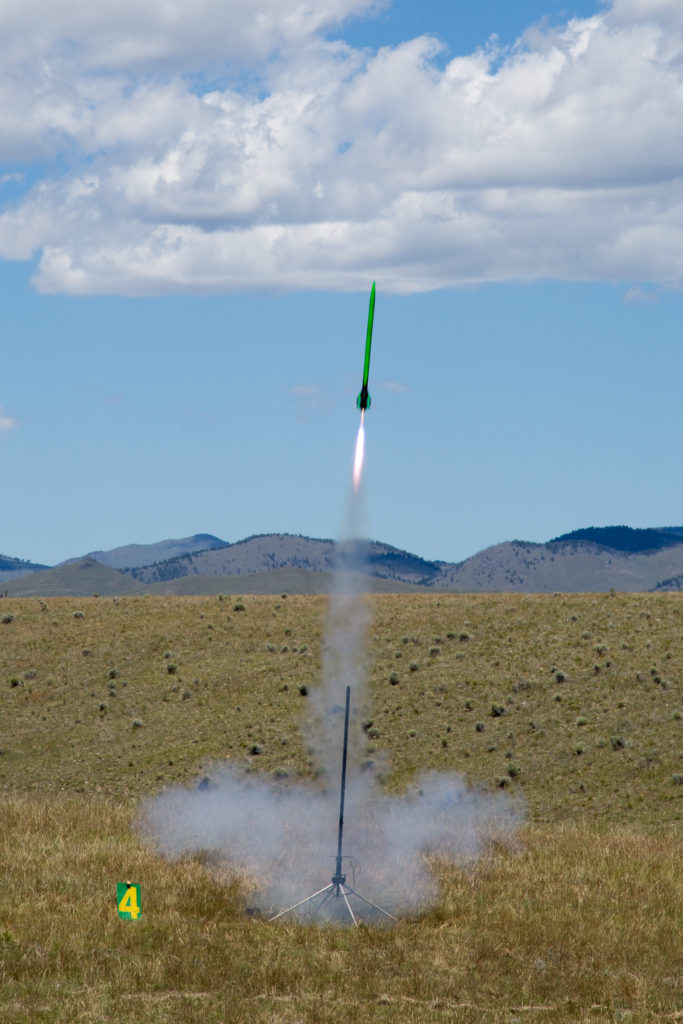
After announcing the certification flight, the rocket and motor details, and the expected altitude, I began the count down and pushed the button! The motor ignited quickly and the rocket quickly left the pad only slightly weather cocking as it hit winds a few hundred feet up. The rocket was tracked to apogee and the two sections were observed to have separated and the main chute deployed. The rocket was then visually tracked during the descent while audio confirmation could be heard from the Eggfinder Receiver that the rocket’s on-board GPS tracking device was functioning properly. The rocket hit a few thermals on the way down, but stayed with-in line of sight until it landed a few hills over.
Once the rocket was down, I grabbed the Eggfinder Receiver, plugged the coordinates in to my phone’s mapping application, and proceeded to walk towards the last location where the rocket was observed. As always seems to be the case, the rocket was actually further away than it appeared, but the Egg finder system worked properly and updated the final location when I got close. Using the phone’s mapping app, I was able to walk right up to the rocket.
The rocket did not have any visible damage, and after checking all of the fins and other components, I determined that nothing had been damaged during the flight and descent. I also could see that the Quantum had fired the ejection charge, and later review of it’s logs confirmed it had been fired shortly after apogee. After connecting to the Quantum with my phone, it showed the rocket had reached 1112 feet in 8.6 seconds with an average acceleration of 6.24Gs, and had landed 107.6 seconds after launch detection.
After returning the rocket, it was inspected by Andrew Horton and Dale Emery who agreed that it was undamaged and signed off on the NAR High Power Certification Application completing my Level 1 Certification.
After disassembling the rocket and cleaning out the booster and rear of the rocket, I watched a few more launches, discussed returning the next month to take the level 2 test (there had been some confusion and they didn’t have one available at the launch that day) and possibly do my level 2 flight, then packed the car and left for Idaho.
A short time after submitting the paperwork to NAR HQ, my new Level 1 card arrived in the mail, then shortly after that I received an unexpected surprise of a Level 1 pin.